> ## Documentation Index
> Fetch the complete documentation index at: https://rain-sandbox-trial.mintlify.site/llms.txt
> Use this file to discover all available pages before exploring further.
# Transfer Collateral Accounts
> If a user needs to update their wallet address used to manage a collateral account, they can follow the process below to update the admin addresses.
# Solana
### [Code example can be found here](https://github.com/SignifyHQ/collateral-contract-integration-examples/tree/main/src/solana/examples/collateralTeamTransfer)
The general flow of the Collateral transfer\_team flow is described as follows:
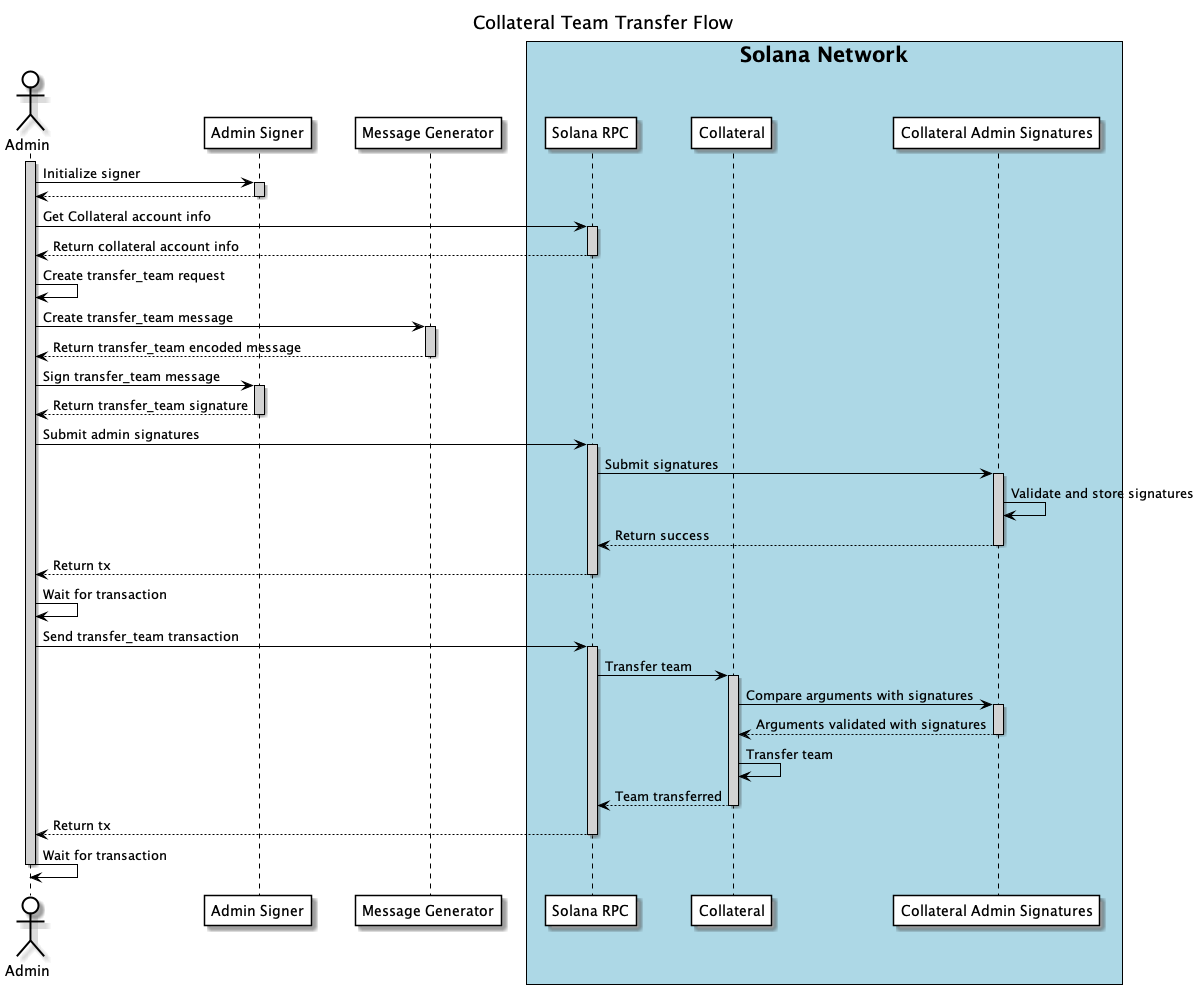 Where:
* **Admin**: Is the admin of the Collateral account that wants to transfer it to either a new admin or group of admins.
* **Admin Signer**: is the Solana account set as admin into the Collateral account that you must have access to sign both transactions and Buffers of information. It can be a custodial wallet like Phantom Wallet, a non-custodial like Privy, a smart account or a multi-sign account.
* **Message Generator**: Is a utility included in this example at the file `messageGenerator.ts` that helps to generate the message that must be signed by your **Admin Signer** to authorize the transference of your Collateral.
* **Solana RPC**: A Solana node connected to the network on either Mainnet, Devnet or Localnet.
* **Collateral**: Is the Collateral account stored in the Solana network that you want to transfer.
* **Collateral Admin Signatures**: Is a support account that will helps to temporary store the autorization given by you **Admin Signer** to transfer the **Collateral** account.
This flow is implemented under the example at the file `index.ts` using a Keypair of the **Admin Signer** to sign the authorization message and send the transaction to the chain. If you want to go deep into the example jump to the [What This Script Does section](https://github.com/SignifyHQ/collateral-contract-integration-examples/tree/main/src/solana/examples/collateralTeamTransfer#-what-this-script-does). Otherwise, continue reading the [How to Create Your Own Integration](https://github.com/SignifyHQ/collateral-contract-integration-examples/tree/main/src/solana/examples/collateralTeamTransfer#-how-to-create-your-own-integration) section.
## 🔧 How to Create Your Own Integration
This section provides a step-by-step guide for creating your own integration to transfer collateral team ownership. It is assumed that you have your own way to load the signer in your environment.
### Step 1: Generate the Request
First, import the types and create a `TransferCollateralTeamRequest` with the new information for the collateral account:
```bash bash theme={null}
import { TransferCollateralTeamRequest } from "./types";
import { PublicKey } from "@solana/web3.js";
// Create the transfer request
const transferRequest: TransferCollateralTeamRequest = {
newName: "New Team Name", // The new name for the collateral account
newAdmins: [
new PublicKey("NewAdmin1PublicKeyHere"),
new PublicKey("NewAdmin2PublicKeyHere")
], // Array of new admin public keys
newAdminThreshold: 2 // Number of admins required to approve future operations
};
```
### Step 2: Generate and Sign the Message
Import the message generator and create a `TransferCollateralTeamMessage` to generate the message that needs to be signed:
```bash bash theme={null}
import { TransferCollateralTeamMessage } from "./messageGenerator";
// Get the current admin data nonce from the collateral account
const currentNonce = collateralAccount.adminDataNonce;
// Create the message to sign
const transferMessage = new TransferCollateralTeamMessage(transferRequest, currentNonce);
// Generate the message buffer that needs to be signed
const messageBuffer = Buffer.from(transferMessage.encode(), "hex");
// Sign the message with your admin signer
// Note: This is where you would use your own signer implementation
const signature = await signer.signMessage(messageBuffer);
```
### Step 3: Upload the Signatures
Create a transaction with two instructions to upload the signatures:
#### 3.1: Ed25519 Instruction
For collateral accounts with a single admin, use the standard `Ed25519Program`:
```bash bash theme={null}
import { Ed25519Program } from "@solana/web3.js";
// Create Ed25519 instruction for single admin
const ed25519Instruction = Ed25519Program.createInstruction({
publicKey: signer.publicKey.toBytes(),
message: messageBuffer,
signature: signature
});
```
For collateral accounts with multiple admins, use the extended program:
```bash bash theme={null}
import { Ed25519ExtendedProgram } from "../utils/ed25519.program";
// Create Ed25519 instruction for multiple admins
const signatureData = {
signer: signer.publicKey,
signature: signature,
message: messageBuffer
};
const ed25519Instruction = Ed25519ExtendedProgram.createSignatureVerificationInstruction([signatureData]);
```
#### 3.2: Submit Signatures Instruction
Create the submit signatures instruction using the Rain program:
```bash bash theme={null}
import { Program } from "@coral-xyz/anchor";
import { Main } from "../types/main";
// Create the signature submission request
const signatureRequest = {
targetNonce: currentNonce,
signatureSubmissionType: {
transferCollateralTeam: {
"0": transferRequest
}
},
salts: [Array.from(crypto.randomBytes(32))] // Random salt for each signature
};
// Create the submit signatures instruction
const submitSignaturesIx = await program.methods
.submitSignatures(signatureRequest as any)
.accounts({
rentPayer: feePayer.publicKey,
collateral: collateralAddress,
collateralAdminSignatures: signaturesAccountAddress,
})
.instruction();
// Send the transaction with both instructions
const transaction = new Transaction()
.add(ed25519Instruction)
.add(submitSignaturesIx);
const txSignature = await sendAndConfirmTransaction(connection, transaction, [feePayer]);
console.log("Signatures uploaded:", txSignature);
```
### Step 4: Send the Transfer Team Transaction
Finally, invoke the `transfer_collateral_team` transaction using the Anchor program:
```bash bash theme={null}
// Generate the PDA for the signatures account
const signaturesAccountAddress = CollateralAdminSignatures.generateTransferCollateralTeamPDA(
collateral,
transferRequest,
program.programId
);
// Create and send the transfer transaction
const transferTx = await program.methods
.transferCollateralTeam(transferRequest)
.accounts({
sender: feePayer.publicKey,
collateral: collateralAddress,
collateralAdminSignatures: signaturesAccountAddress,
})
.signers([feePayer])
.rpc();
console.log("Transfer completed:", transferTx);
```
### Important Notes
* **Signer Implementation**: You must implement your own way to load and use the signer in your environment
* **Transaction Size Limits**: Solana has a 1232-byte transaction size limit, so keep the number of admins reasonable (recommended max: 5)
* **Nonce Management**: Always use the current adminDataNonce from the collateral account to prevent replay attacks
* **Error Handling**: Implement proper error handling for network issues, insufficient funds, and invalid signatures
* **Testing**: Always test on devnet before deploying to mainnet
## 🏗️ Design Considerations
### Why This Two-Step Flow?
**Authorization Mechanism**: The authorization is provided by admins signing a message that includes the operation arguments (new name, list of admins, and threshold value). This signature is submitted to the chain for verification and stored in an account that holds the authorization until consumed during transfer execution. Verification occurs by:
1. Checking that the signature generated using the Ed25519 curve belongs to a current admin of the collateral
2. Verifying that the signed message matches the expected one corresponding to the transfer invocation arguments
**Two-Step Signature Submission**: Signatures are submitted in two steps due to Solana's transaction size limitation of 1232 bytes. Each signature takes 160 bytes of transaction space for verification, which for some operations allows only 2 signatures per transaction. By submitting signatures to a storage account first, we unlock the admin limit by sending signatures in batches of 4-5 per transaction, then executing the transfer with the pre-verified signatures.
### [Ready to use example can be found here](https://github.com/SignifyHQ/collateral-contract-integration-examples/tree/main/src/solana/examples/collateralTeamTransfer#-how-to-create-your-own-integration)
Where:
* **Admin**: Is the admin of the Collateral account that wants to transfer it to either a new admin or group of admins.
* **Admin Signer**: is the Solana account set as admin into the Collateral account that you must have access to sign both transactions and Buffers of information. It can be a custodial wallet like Phantom Wallet, a non-custodial like Privy, a smart account or a multi-sign account.
* **Message Generator**: Is a utility included in this example at the file `messageGenerator.ts` that helps to generate the message that must be signed by your **Admin Signer** to authorize the transference of your Collateral.
* **Solana RPC**: A Solana node connected to the network on either Mainnet, Devnet or Localnet.
* **Collateral**: Is the Collateral account stored in the Solana network that you want to transfer.
* **Collateral Admin Signatures**: Is a support account that will helps to temporary store the autorization given by you **Admin Signer** to transfer the **Collateral** account.
This flow is implemented under the example at the file `index.ts` using a Keypair of the **Admin Signer** to sign the authorization message and send the transaction to the chain. If you want to go deep into the example jump to the [What This Script Does section](https://github.com/SignifyHQ/collateral-contract-integration-examples/tree/main/src/solana/examples/collateralTeamTransfer#-what-this-script-does). Otherwise, continue reading the [How to Create Your Own Integration](https://github.com/SignifyHQ/collateral-contract-integration-examples/tree/main/src/solana/examples/collateralTeamTransfer#-how-to-create-your-own-integration) section.
## 🔧 How to Create Your Own Integration
This section provides a step-by-step guide for creating your own integration to transfer collateral team ownership. It is assumed that you have your own way to load the signer in your environment.
### Step 1: Generate the Request
First, import the types and create a `TransferCollateralTeamRequest` with the new information for the collateral account:
```bash bash theme={null}
import { TransferCollateralTeamRequest } from "./types";
import { PublicKey } from "@solana/web3.js";
// Create the transfer request
const transferRequest: TransferCollateralTeamRequest = {
newName: "New Team Name", // The new name for the collateral account
newAdmins: [
new PublicKey("NewAdmin1PublicKeyHere"),
new PublicKey("NewAdmin2PublicKeyHere")
], // Array of new admin public keys
newAdminThreshold: 2 // Number of admins required to approve future operations
};
```
### Step 2: Generate and Sign the Message
Import the message generator and create a `TransferCollateralTeamMessage` to generate the message that needs to be signed:
```bash bash theme={null}
import { TransferCollateralTeamMessage } from "./messageGenerator";
// Get the current admin data nonce from the collateral account
const currentNonce = collateralAccount.adminDataNonce;
// Create the message to sign
const transferMessage = new TransferCollateralTeamMessage(transferRequest, currentNonce);
// Generate the message buffer that needs to be signed
const messageBuffer = Buffer.from(transferMessage.encode(), "hex");
// Sign the message with your admin signer
// Note: This is where you would use your own signer implementation
const signature = await signer.signMessage(messageBuffer);
```
### Step 3: Upload the Signatures
Create a transaction with two instructions to upload the signatures:
#### 3.1: Ed25519 Instruction
For collateral accounts with a single admin, use the standard `Ed25519Program`:
```bash bash theme={null}
import { Ed25519Program } from "@solana/web3.js";
// Create Ed25519 instruction for single admin
const ed25519Instruction = Ed25519Program.createInstruction({
publicKey: signer.publicKey.toBytes(),
message: messageBuffer,
signature: signature
});
```
For collateral accounts with multiple admins, use the extended program:
```bash bash theme={null}
import { Ed25519ExtendedProgram } from "../utils/ed25519.program";
// Create Ed25519 instruction for multiple admins
const signatureData = {
signer: signer.publicKey,
signature: signature,
message: messageBuffer
};
const ed25519Instruction = Ed25519ExtendedProgram.createSignatureVerificationInstruction([signatureData]);
```
#### 3.2: Submit Signatures Instruction
Create the submit signatures instruction using the Rain program:
```bash bash theme={null}
import { Program } from "@coral-xyz/anchor";
import { Main } from "../types/main";
// Create the signature submission request
const signatureRequest = {
targetNonce: currentNonce,
signatureSubmissionType: {
transferCollateralTeam: {
"0": transferRequest
}
},
salts: [Array.from(crypto.randomBytes(32))] // Random salt for each signature
};
// Create the submit signatures instruction
const submitSignaturesIx = await program.methods
.submitSignatures(signatureRequest as any)
.accounts({
rentPayer: feePayer.publicKey,
collateral: collateralAddress,
collateralAdminSignatures: signaturesAccountAddress,
})
.instruction();
// Send the transaction with both instructions
const transaction = new Transaction()
.add(ed25519Instruction)
.add(submitSignaturesIx);
const txSignature = await sendAndConfirmTransaction(connection, transaction, [feePayer]);
console.log("Signatures uploaded:", txSignature);
```
### Step 4: Send the Transfer Team Transaction
Finally, invoke the `transfer_collateral_team` transaction using the Anchor program:
```bash bash theme={null}
// Generate the PDA for the signatures account
const signaturesAccountAddress = CollateralAdminSignatures.generateTransferCollateralTeamPDA(
collateral,
transferRequest,
program.programId
);
// Create and send the transfer transaction
const transferTx = await program.methods
.transferCollateralTeam(transferRequest)
.accounts({
sender: feePayer.publicKey,
collateral: collateralAddress,
collateralAdminSignatures: signaturesAccountAddress,
})
.signers([feePayer])
.rpc();
console.log("Transfer completed:", transferTx);
```
### Important Notes
* **Signer Implementation**: You must implement your own way to load and use the signer in your environment
* **Transaction Size Limits**: Solana has a 1232-byte transaction size limit, so keep the number of admins reasonable (recommended max: 5)
* **Nonce Management**: Always use the current adminDataNonce from the collateral account to prevent replay attacks
* **Error Handling**: Implement proper error handling for network issues, insufficient funds, and invalid signatures
* **Testing**: Always test on devnet before deploying to mainnet
## 🏗️ Design Considerations
### Why This Two-Step Flow?
**Authorization Mechanism**: The authorization is provided by admins signing a message that includes the operation arguments (new name, list of admins, and threshold value). This signature is submitted to the chain for verification and stored in an account that holds the authorization until consumed during transfer execution. Verification occurs by:
1. Checking that the signature generated using the Ed25519 curve belongs to a current admin of the collateral
2. Verifying that the signed message matches the expected one corresponding to the transfer invocation arguments
**Two-Step Signature Submission**: Signatures are submitted in two steps due to Solana's transaction size limitation of 1232 bytes. Each signature takes 160 bytes of transaction space for verification, which for some operations allows only 2 signatures per transaction. By submitting signatures to a storage account first, we unlock the admin limit by sending signatures in batches of 4-5 per transaction, then executing the transfer with the pre-verified signatures.
### [Ready to use example can be found here](https://github.com/SignifyHQ/collateral-contract-integration-examples/tree/main/src/solana/examples/collateralTeamTransfer#-how-to-create-your-own-integration)